Focus-Variation delivers high-resolution, 3D measurement at full depth-of-field.
It enables repeatable, traceable and highly efficient surface roughness analysis as well as form and wear measurement.
Combine a CMM with a surface measurement system
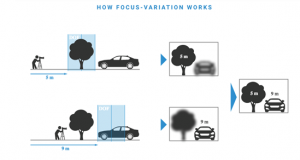
By combining the functionality of the micro coordinate measurement machine (CMM) and surface measurement system, quality control processes are transformed. Focus-Variation technology captures topographical and colour information with a visible light that is focused onto the specimen through a precision optic. Illumination intensity is varied (often by a signal generator) and the precision optic is moved vertically along its optical access.
Through this movement different parts of the surface are brought in and out of focus and this data is continuously captured. A complete detection of the surface over the full vertical range is therefore achieved. Measurement resolution can be changed by adding different objectives, giving vertical resolutions from several µm down to 10nm. Algorithms convert the acquired sensor data into 3D information and a true colour image with full depth of field.
What does Focus-Variation measure?
Focus-Variation therefore enables the measurement of complex geometries and is highly suited for applications across all sectors including automotive, aerospace and precision manufacturing.
The technology offers an unrivalled solution for the complete measurement of turbines in the aerospace industry; measuring full geometry of the blades, break edges, defects and freeform cooling holes.
The Bruker Alicona range also offers a portable Focus-Variation machine for the measurement of road surface roughness for the Autosport sector.
Focus-Variation offers an intuitive solution for faster measurement
In the measurement of form and roughness, the efficiency of the production process has historically been limited by the complexity of using CMM and surface measurement systems in tandem. Data is often not easily shared between these devices and highly trained quality control staff are required.
By utilising Focus-Variation technology, Bruker Alicona devices offer an intuitive solution for the faster, more detailed measurement of whole areas – even with steep flanks of up to 80°. Surfaces with significantly different optical reflectance values can also be measured due to the range of suitable illumination sources, including an industrial ring light. Furthermore, the measured surface is not touched, removing risk of damage.

At Optimax we are proud suppliers of the Bruker Alicona range – market leading Focus-Variation machines. These combine high resolution, high repeatability with high accuracy for production, research and development applications. Our Sales Engineers would be happy to explain further and take you through a no-obligation demonstration at our UK demonstration centre – just give us a call on 01858 436940 or click here to book a demo.


